
Every gamer wants a setup that feels uniquely theirs. From custom RGB profiles to personalized keybinds, the demand for tailored gaming experiences has never been higher. At the center of this movement sits one innovation that’s quietly revolutionizing how we interact with our most essential peripheral: the hot-swappable keyboard. Unlike traditional boards that lock you into a single switch type forever, hot-swappable designs let you experiment, adapt, and perfect your typing feel without picking up a soldering iron.
The Rise of Hot-Swappable Switches in Gaming Keyboards
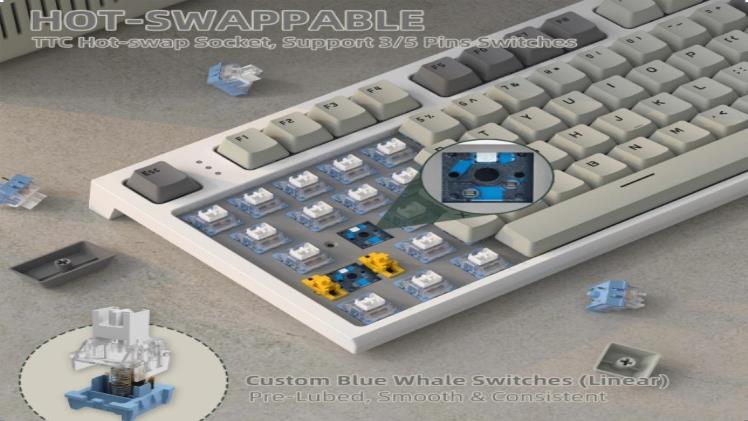
The gaming keyboard landscape has shifted dramatically over the past few years. Where once you’d commit to a single switch type at purchase and live with that decision for the keyboard’s entire lifespan, hot-swappable switches have introduced a fundamentally different philosophy. These boards feature specialized sockets that grip mechanical switches firmly in place without requiring permanent solder joints. The result is a gaming keyboard you can reconfigure in minutes rather than hours, adapting your setup as your preferences evolve or as different games demand different input characteristics.
Traditional soldered keyboards bond each switch directly to the PCB with molten metal. Changing even one switch means heating up a soldering station, carefully desoldering the old component, and soldering in the replacement—a process that risks damaging the circuit board if you’re inexperienced. Hot-swappable switches eliminate this barrier entirely. You simply pull out the existing switch and press a new one into the socket. This accessibility has made mechanical keyboard customization approachable for gamers who want to experiment but don’t have electronics repair skills or equipment.
What Makes a Switch Hot-Swappable?
The magic lies in the socket design on the PCB. Instead of through-hole solder pads, hot-swap boards use spring-loaded or friction-fit sockets—often made by manufacturers like Kailh or Gateron—that accept the two metal pins on a standard MX-style switch. When you insert a switch, the pins slide into these sockets and make electrical contact through pressure alone. This means any compatible switch can be installed or removed in seconds using a basic switch puller tool. Most hot-swap PCBs support the universal 3-pin and 5-pin configurations, giving you access to hundreds of switch options from dozens of manufacturers without worrying about compatibility issues.
Types of Switches for Customization
Mechanical switches generally fall into three categories, each offering a distinct gaming experience. Linear switches travel smoothly from top to bottom with no bump or click, making them popular for fast-paced games where rapid key presses matter. Tactile switches provide a noticeable bump partway through the keystroke, giving you physical confirmation of actuation without excessive noise—ideal for gamers who also type frequently. Clicky switches combine that tactile bump with an audible click sound, satisfying for some but potentially distracting in shared spaces. With a hot-swappable gaming keyboard, you’re free to mix and match these types across different keys, assigning linears to your WASD cluster while keeping tactiles on utility keys for more deliberate inputs.
How Customization Elevates Your Gaming Experience
The connection between keyboard customization and actual gaming performance isn’t just marketing hype—it’s rooted in how our hands interact with input devices during high-pressure moments. When your keyboard responds exactly the way your muscle memory expects, you eliminate micro-hesitations that accumulate over a gaming session. Hot-swappable switches turn your keyboard into a living tool that evolves alongside your skills and game library, rather than a static piece of hardware you tolerate until it breaks.
Beyond raw performance, customization addresses the ergonomic reality that no two gamers use their keyboards identically. Someone who plays rhythm games for hours needs a different actuation profile than a competitive FPS player who barely touches half the board. The ability to swap switches means you can reduce finger fatigue on heavily-used keys by choosing lighter springs, or add resistance to keys you accidentally press during intense moments. This level of control over your gaming experience used to require owning multiple keyboards—now it requires a few minutes and a handful of switches.
Personalizing Feel and Response
Actuation force—the pressure needed to register a keypress—directly impacts your reaction speed and stamina. Lighter switches around 35-45g let you trigger inputs with minimal effort, shaving milliseconds off repeated actions in games where APM matters. Conversely, heavier switches around 60-67g on modifier keys prevent accidental presses during frantic gameplay. Travel distance plays a similar role; shorter travel switches actuate faster, giving you a speed advantage in twitch shooters. With hot-swap capability, you can test different force curves on your most critical keys and settle on the combination that makes your inputs feel instinctive rather than effortful.
Aesthetic and Functional Tweaks
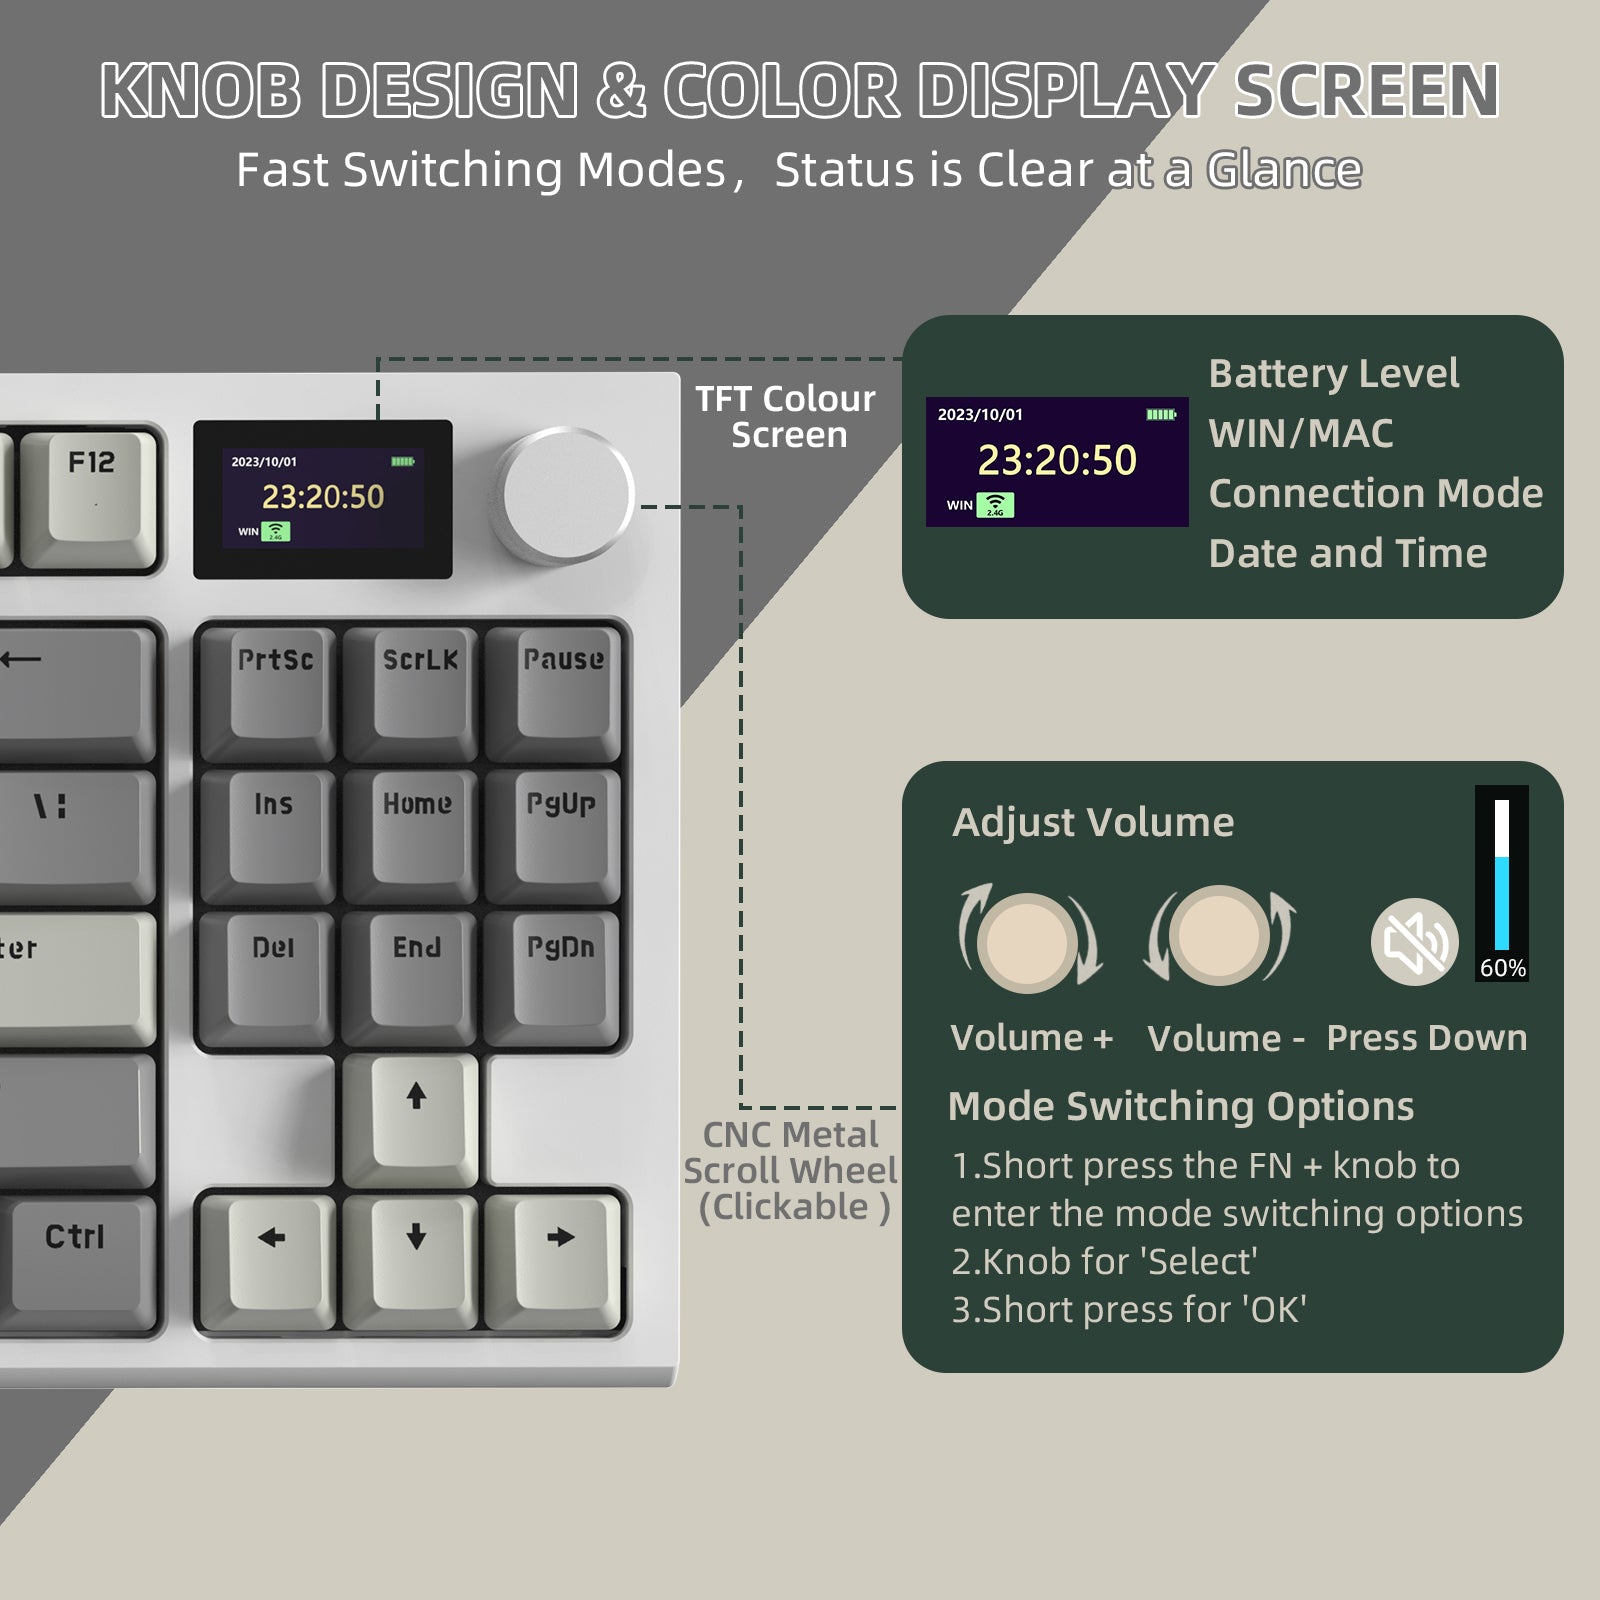
Customization extends well beyond the switches themselves. Swapping keycaps to PBT double-shot sets improves durability and grip texture while completely transforming your board’s visual identity. Many budget hot-swappable keyboards include full RGB backlighting that you can program per-key, creating visual zones that correspond to in-game bindings or simply matching your room’s aesthetic. Macro programming through companion software adds another functional layer, letting you assign complex command sequences to single keypresses. Together, these tweaks create a setup that looks, feels, and functions as an extension of your personal gaming style.
Smart Shopping: Balancing Your Keyboard Budget and Features
Finding a gaming keyboard that delivers genuine hot-swap capability without draining your bank account requires knowing where manufacturers cut corners and where they don’t. The good news is that competition in the budget mechanical keyboard space has intensified dramatically, pushing quality upward while keeping prices accessible. The key is understanding which features actually impact your daily gaming experience versus which ones simply look impressive on a spec sheet.
When evaluating your keyboard budget, think in terms of long-term value rather than upfront cost alone. A slightly more expensive board with quality hot-swap sockets will save you money over time because you can upgrade switches incrementally instead of replacing the entire keyboard when your preferences change. Look at the PCB and case construction first—these are the components you’ll live with permanently. Switches and keycaps can always be swapped later, so don’t overpay for premium stock switches when you plan to replace them anyway. Allocate roughly 60% of your total budget to the board itself and reserve the rest for switches and keycaps you’ll add over time. This approach lets you start gaming immediately while building toward your ideal configuration at a pace your wallet can handle.
Key Features to Look for in a Budget Gaming Keyboard
Prioritize build quality over flashy extras when shopping on a budget. A solid aluminum or reinforced plastic case prevents flex during intense gaming sessions and protects the PCB underneath. N-key rollover ensures every simultaneous keypress registers accurately—essential during complex in-game maneuvers where you’re holding multiple inputs at once. Check whether the board offers companion software for remapping keys and adjusting lighting, since some budget options rely on onboard memory with limited customization. The hot-swap sockets themselves matter too; look for boards using Kailh or Gateron sockets rated for thousands of insertion cycles, as cheaper alternatives can loosen prematurely and create intermittent connection issues. Finally, confirm 5-pin switch support, which gives you access to the widest range of aftermarket switches without needing to clip stabilizing pins.
Top Budget-Friendly Hot-Swappable Keyboards
Several brands have established themselves as reliable options for budget-conscious gamers seeking hot-swap functionality. Keychron’s entry-level lineup consistently delivers solid aluminum frames, wireless connectivity, and 5-pin hot-swap sockets at accessible price points. Royal Kludge offers compact form factors with both Bluetooth and wired modes, making them versatile for gaming and productivity. ATTACK SHARK has gained attention for delivering feature-rich hot-swappable boards with impressive build quality at competitive prices, appealing to gamers who want premium feel without the premium cost. Epomaker has carved out a niche with unique layouts and gasket-mount designs that rival boards costing twice as much. Womier stands out for transparent case designs with impressive RGB diffusion. Each of these brands provides a foundation you can build upon—start with the stock configuration, then gradually swap in premium switches and keycaps as your budget allows. Reading community reviews on forums and enthusiast subreddits will help you identify which specific models within these brands offer the best socket longevity and PCB reliability for sustained gaming use.
Your DIY Guide: Step-by-Step Keyboard Customization
Now that you understand the landscape of hot-swappable switches and know what to look for in a budget board, it’s time to actually build your ideal setup. The beauty of hot-swap customization is that the entire process requires no technical expertise—if you can pull a cap off a marker, you can customize a mechanical keyboard. This walkthrough covers everything from preparation through final testing, designed specifically for first-timers who want to get it right without second-guessing themselves.
Before diving in, take a moment to plan your layout intentionally. Think about which games you play most and which keys take the heaviest beating. Map out where you want lighter switches for rapid inputs versus where heavier or tactile options make sense for deliberate presses. Having a clear plan prevents the frustrating cycle of swapping the same keys repeatedly and helps you order exactly the right quantity of each switch type. Write down your layout on paper or use an online keyboard layout tool to visualize your configuration before you start pulling anything apart.
Tools and Preparations
You need surprisingly little equipment to get started. A switch puller—usually included with hot-swappable boards—grips switches from both sides for clean extraction. A keycap puller, typically a wire-style tool, removes keycaps without scratching them. Clear a flat, well-lit workspace and lay down a soft cloth or mat to protect your board’s surface. Keep a small container nearby for loose keycaps so nothing rolls away. If your new switches arrived with bent pins, a flat surface or needle-nose pliers will straighten them before installation. That’s genuinely all you need—no soldering equipment, no multimeter, no specialized knowledge.
Swapping Switches: A Detailed Walkthrough
Start by removing the keycaps from the keys you plan to modify. Slide your wire keycap puller under the cap, squeeze gently, and pull straight up with even pressure. Once the switch stems are exposed, position your switch puller around the first switch, gripping the small clips on the north and south sides of the housing. Squeeze the puller to release the retention clips and pull the switch straight out of the socket—avoid wiggling or angling, which can bend the socket pins. Now take your replacement switch and inspect the two metal pins on the bottom, ensuring they’re perfectly straight. Align the pins with the socket holes, orient the switch correctly matching the PCB’s pin layout, and press down firmly until you feel it click into place. The switch should sit flush with the plate without any wobble. Repeat this process for each key in your planned layout, working methodically across the board rather than jumping around randomly.
Testing and Fine-Tuning Your Setup
Once all switches are seated, replace your keycaps and connect the keyboard to your computer. Open a key testing website or your board’s companion software and press every single modified key to confirm registration. If a key doesn’t respond, unplug the board, remove that switch, check for bent pins, straighten if necessary, and reinsert. After confirming functionality, load up your primary game and spend fifteen to twenty minutes playing intentionally. Pay attention to whether any key feels too light, too heavy, or inconsistent with your expectations. Don’t hesitate to swap individual switches based on this real-world feedback—that iterative refinement is exactly what hot-swap boards are designed for.
Build Your Perfect Hot-Swap Setup Today
Hot-swappable keyboards have democratized mechanical keyboard customization in ways that would have seemed impossible just a few years ago. What once required specialized soldering skills and expensive equipment now takes nothing more than a simple pull-and-press motion. The key takeaways are straightforward: hot-swappable switches give you the freedom to experiment with linear, tactile, and clicky options until you find your perfect configuration, and today’s budget market offers genuinely impressive boards from brands like Keychron, Royal Kludge, and Epomaker that won’t compromise your wallet or your gaming performance.
The path forward is clear—start with a reliable hot-swap board that fits your budget, plan your switch layout based on how you actually game, and refine iteratively as you discover what feels right under your fingers. You don’t need to achieve perfection on day one. The entire point of hot-swap technology is that your keyboard grows with you, adapting to new games, evolving preferences, and developing skills. Personalization doesn’t require a premium price tag anymore. It just requires curiosity, a switch puller, and the willingness to make your setup truly yours.